Deeper into OpenCL
In this post, I hope to give a high level understanding of OpenCL and its workings
Setting it up

OpenCL is relatively easy to get up and running on your system.
-
For users: All you need, is the OpenCL runtime for your device! In case of Nvidia, this comes with the Nvidia drivers, while for Intel CPUs, this has to be manually installed by a package manager.
-
For developers: You will need the OpenCL library to link against, and the OpenCL headers as well, again easily available in your package manager.
Here’s a new perspective
OpenCL presents a general interface to the developer, no matter what the device or the architecture.
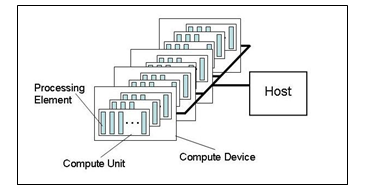
Firstly, we have the host, which is responsible for all the book-keeping, and task scheduling on the OpenCL device.
Then, we have our OpenCL device, which is divided into a number of compute units. Each Compute Unit (CU) is further divided into a number of processing elements.
But what do these words actually mean?
Well, a Processing Element(PE) is a single unit, that is responsible for executing a single thread(also called a work item). Think of a single function being executed.
Each PE has its own private memory, not accessible by anyone, but this PE
A bunch of processing elements are grouped together to form a compute unit which, at a time, executes a single work group(grouping of many work items).
The CUs all share a global memory, accessible by anyone
So for a CPU, the maximum number of CU s is the number of CPU cores!
But why do you want work groups? Why not have work items only?
Well, having this grouping of work items, allows for a greater deal of complexity, because we can synchronize across items in a work group, have a local memory only for this work group, and more…
A complete walkthrough
Let’s look at a typical workflow for an OpenCL program
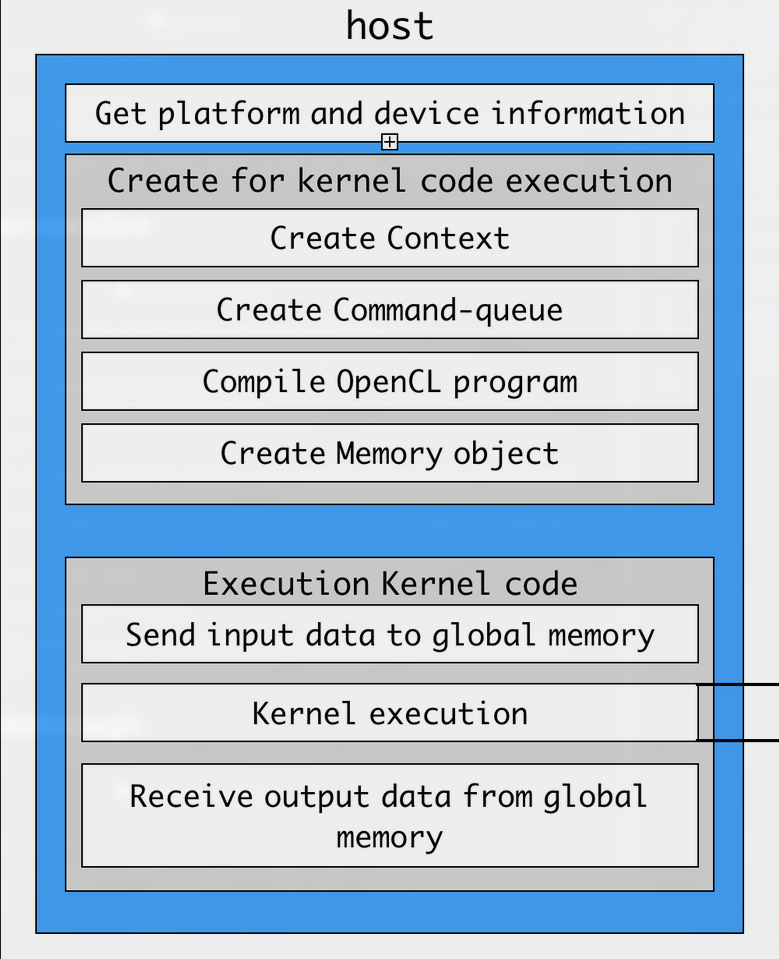
Initialisation
First we need to check the currently available OpenCL platforms, which are basically implementations of OpenCL available on your system
For example, you can have both Intel OpenCL and POCL OpenCL for your i7 CPU.
Then from these platforms, you need to choose a device to execute on. OpenCL supports CPUs, GPUs, FPGAs, and all sorts of accelerators.
Context
Once you have the platform and device you wish to use, you need to create an OpenCL context, which will handle everything for that particular platform and device.
Command Queue
Then, you have to create a command queue, which, as the name suggests, will store any commands(kernels) you queue for execution, and dispatch them in order(or even out of order if you like!).
Kernel
After the command queue, you must compile the kernel source code(the api provides functions to do this), so that it can be executed later.
Memory
Finally, one of the most important parts of this entire process, is passing the input to the OpenCL device.
Now, initially the data is stored on your CPU RAM, which is unfortunately inaccessible to your GPU.
Therefore you need to copy the data to your GPU RAM, using the cl_mem interface that OpenCL provides.
However, if you know that the device being used is the same CPU, then this copy can be skipped, to save time, using the CL_MEM_USE_HOST_PTR flag while creating a cl_mem object.
Execution
At the end, you can use the command queue created earlier along with the cl_mem created previously to execute the compiled kernel on the device
Subsequently don’t forget to copy the output data back to CPU RAM, if the execution was done on GPU.
However, there’s still a ton of unexplained stuff like, “How do you save the time wasted in copying data to the device?” or “Can you pass any data to the device? Even structs?”
We’ll explore OpenCL more in subsequent posts.