Integrating OpenCL with Gnuastro
Background
In the last post, I discussed what is OpenCL and why we chose to integrate it with Gnuastro. In this post, I’ll be discussing the actual implementation and the challenges I faced.
Programming in OpenCL
The OpenCL 3.0 standard has done a great job of simplifying the programming model. The OpenCL 3.0 API is a header-only library that provides a modern, object-oriented interface to the OpenCL runtime. It is designed to be easy to use and provides a abstraction of the OpenCL runtime, making it easier to write portable code across different OpenCL implementations. We still have to communicate with the driver (unlike CUDA) at a low level, but this becomes a mandatory step when we want to run our code on different hardware (CUDA always expects an NVIDIA device).
Here’s a general overview of steps to be followed when writing an using OpenCL :
-
Check for available Platforms : A platform is a collection of OpenCL devices. A platform can be a CPU, GPU, or an FPGA (Remember OpenCL can work with any platform!). This is done specifically to identify which OpenCL implementation will be used during runtime. We can query the system for available platforms using the
clGetPlatformIDsfunction. This function returns a list of platforms available on the system. -
Check for available devices : A device is a physical device that can execute OpenCL kernels. A device can be a CPU, GPU, or an FPGA. We can query the system for available devices using the
clGetDeviceIDsfunction. This function returns a list of devices available on the system. - Create a context : A context is a container for all the OpenCL objects. It is used to manage the memory, command queues, and other OpenCL objects. It is created by passing a list of devices to the constructor. Since OpenCL can work with multiple devices, we can create a context with multiple devices. This is useful when we want to run our code on multiple devices at the same time.
- Create a command queue : A command queue is used to queue up commands for the device to execute. The command queue is used to give commands to the device. The device executes the commands in the order they are received. The commands can be kernel execution, memory transfer, or any other OpenCL command. We can also create multiple command queues. This is useful when we want to run to multiple commands. Command queues in OpenCL are asynchronous by default. This means that the commands are queued up and the control is returned to the host. The host can then continue with other tasks. We can also create a synchronous command queue. This means that the commands are queued up and the control is returned to the host only when the commands are executed.
-
Load the Kernel : A kernel is a function that is executed on the device. It is written as per the
C99 standard. We can load the kernel from a file or we can write the kernel inline. To maintain portablitiy, OpenCL kernels are generally compiled at runtime usingclBuildProgram. We can also compile the kernel offline. This is useful when we want to compile the kernel for a specific device. -
Copy Data to device memory : All the data used in kernel, must be on the device memory. So we have to copy the data from the host to the device memory. We can do this using the
clCreateBufferfunction. This function creates a buffer on the device memory. We can then copy the data from the host to the device using theclEnqueueWriteBufferfunction. This function copies the data from the host to the device. -
Launch the kernel : We can launch the kernel by passing the kernel object to the command queue. We have to set the arguments for the kernel seperately, using the
clSetKernelArgfunction. We can also set the global and local work size. The global work size is the total number of work items that will be executed. The local work size is the number of work items that will be executed in a work group. The global work size should be a multiple of the local work size. If the global work size is not a multiple of the local work size, then the global work size is rounded up to the next multiple of the local work size. -
Read the output : We can read the output from the device using the
clEnqueueReadBufferfunction. This function copies the data from the device to the host.
Implementation
Among all the steps mentioned above, everything up till loading the kernel is common to all the programs that’ll be using OpenCL. So we defined a gpu_utils module which is responsible for querying for the available platforms and devices, creating the context and command queue, loading and compiling the kernel. The only external data it requires is the path to the kernel file. This is provided as an input.
It also provides utility functions to copy specific data types to and from device memory.
There’ll be 2 types of OpenCL program in Gnuastro :
- Programs using OpenCL to speed-up existing operations inside Gnuastro.
- User defined OpenCL kernels, responsible for performing a custom task.
Programs using OpenCL to speed-up existing operations inside Gnuastro
These programs will be using OpenCL to speed-up existing operations inside Gnuastro. For example, we can use OpenCL to speed-up the astconvolve operation by passing an extra --gpu. For these programs, the OpenCL kernels will be part of the Gnuastro Library.
The general flow of the program then becomes :
- The user passes the input data for a specific operation, and also choses the local and global work size.
- The program then initializes the device using
gpu_utilsmodule by providing the kernel file from the library, which does everything and returns acl_kernel(which is essentially the compiled kernel). - Data transfer from CPU to device (GPU) is done using the functions provided by
gpu_utilsmodule. - The kernel is launched using with the provided global and local work size.
- Data is copied back to CPU memory and returned to the user.
User defined OpenCL kernels, responsible for performing a custom task
These programs will be using OpenCL to perform a custom task. For example, we can use OpenCL to perform a custom convolution operation by passing a custom kernel. For these programs, the OpenCL kernels will be provided by the user. The exact design details yet to be determined for this.
Results
Input image is 10,000 x 20,000 random image with normal distribution. Kernel is 7 x 7 standard convolution kernel. CPU : Intel(R) Core(TM) i5-9300HF CPU @ 2.40GHz GPU : NVIDIA GeForce GTX 1650
Convolution using existing convolution in Gnuastro :

Convolution on OpenCL :
Result
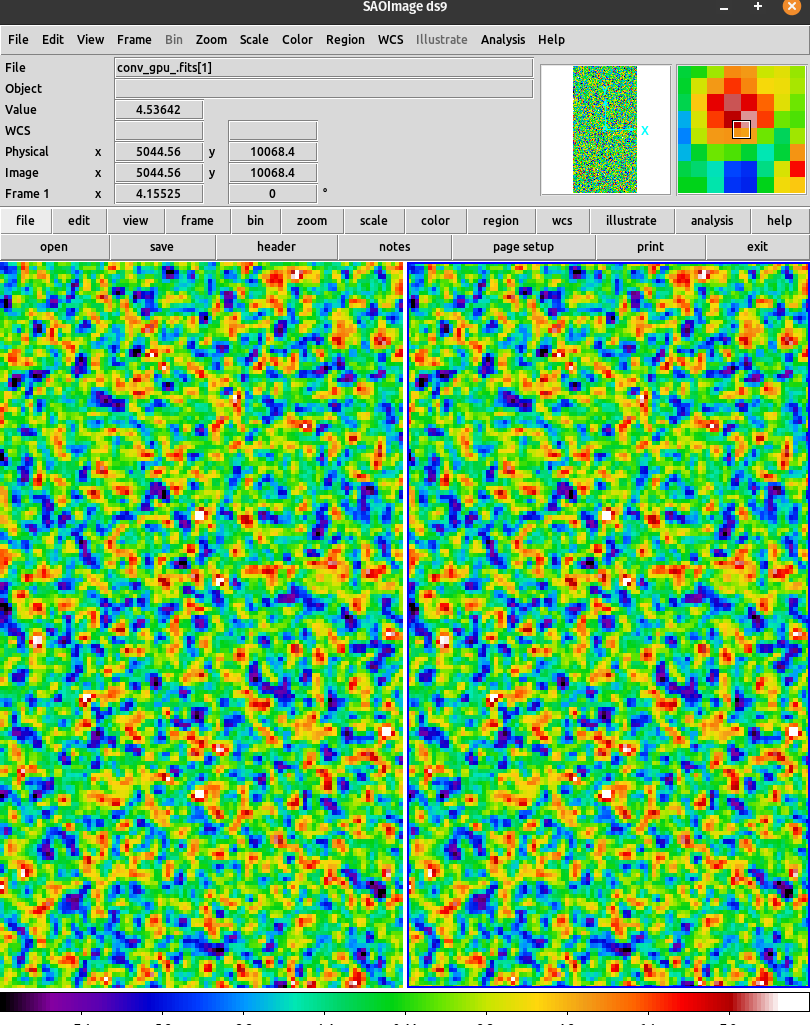
The speed up for convolution operation is specifically ranges from 300-500x, but for the entire operation its around 3-5x due to the overhead of copying data to and from the device. Overcoming this is a big and important challenge!
Challenges
-
No
GAL_DATA_Tinside OpenCL kernel! : Inside OpenCL,cl_memis the primary object used to represent memory objects such as buffers and images. It is used to allocate memory on the device. Regardless of where the data is coming from on device (arrays, structs, etc), it’s all converted into acl_memobject when copied to the device.
However inside Gnuastro, the core data structure is gal_data_t which is essentially just a C struct.
Why is this a problem? Well the raw data of the input image/table is not contained inside the gal_data_t. It merely consists a pointer to that data! So wehn we copy the gal_data_t to device, the raw data(which is huge) is not copied. (It lives on the CPU memory, and hence cant use CPU pointers on GPU memory).
What about copying the raw data seperately on the GPU memory, and then replacing the pointer inside gal_data_t with a pointer which has the address on the GPU memory? Well, this is not possible either. Why? See, when we are on CPU, we’ve a good gal_data_t struct which is a single big object with ‘sub-objects’(one of which is the pointer). But on GPU, we’ve a cl_mem which is an object, but unlike structs, it cant have sub-objects!
How do we solve this? Currently all the required pointers inside gal_data_t are passed as seperate arguments to the kernel. After a careful study of the internal implementation of the cl_mem object, we’ll see if we can directly pass the gal_data_t to the kernel.
- Data Transfer Overhead : As mentioned multiple times, for using GPUs, we must copy data to and from the GPU memory. Astronomical datasets are huge, and copying them for each operation is a big overhead! Infact the data transfer overhead is so huge, that the actual operation is much faster than the data transfer. Adding more to that, its not just faster, its much much faster! So much so that around 95% of the time is spent in copying data to and from the GPU memory. It reduces performance by ~100x! It can’t continue this way!
One solution we’ve figured is, when the External data is loaded for the first time in the program, we load it on the GPU memory instead of the CPU memory. This way, for each subsequent operation, we dont have to copy the data from CPU to GPU memory. After all the operations are done, we’ll copy the result back to CPU memory and save it to the disk. This will avoid almost all the Data Transfer overhead.
This is about the same approach used by Machine Learning Libraries such as Tensorflow. Basically during initialization, it occupies all the GPU memory it can, and keeps it occupied. All the operations, their results and the subsequent operations are done on the GPU memory itself.